Categories
Plastering

Renovating History: Managing Plastering Challenges During a Heatwave

Renovating History: Managing Plastering Challenges During a Heatwave

Our current renovation project in Sandiacre, Derbyshire has been a journey. After navigating initial labour hurdles, we’re glad to say the project is back on track.

Working on a property that is over 100 years old is rarely straightforward; achieving a top-quality, modern finish on historic walls requires patience, experience, and the right hands. That is why we brought in Anthony Wood from [link removed] in Long Eaton to handle the heavy lifting.

img_6875
previous arrow
next arrow

We have a new Media Wall arriving next week, and in preparation, we made the strategic decision to fully replaster the master bedroom and the living room (excluding the areas where the media and fitted furniture will sit). While it is tempting to spend days sanding and filling, we’ve found that it is often better to take the hit and replaster the whole room to ensure a flawless, long-lasting canvas. The Heatwave Challenge

Just as we were making progress, Mother Nature threw us a curveball. We were plastering right in the middle of some of the highest temperatures ever recorded in the United Kingdom.

The heat proved to be quite a challenge. Anthony was on-site by 6 am every morning to squeeze in a few productive hours before the heat of the day truly struck, but it was still a battle against the elements. At one point, the living room ceiling had to be plastered twice because the heat was so intense that the first coat “went off” (dried) far too quickly to achieve a smooth finish.Why Heat Affects Plaster

That experience was a vivid reminder of why plastering in extreme heat is such a technical risk. When the evaporation of water exceeds the material’s hydration rate, you often encounter several structural and aesthetic defects:

  • Shrinkage Cracking: Rapid moisture loss causes the plaster to shrink before it has gained sufficient internal strength, leading to hairline cracks or “spiderweb” micro-cracking.
  • Weak Adhesion and Surface Strength: If the surface dries too quickly, the plaster won’t bond correctly to the substrate. This results in a weak, powdery, or chalky finish that makes for a poor base for decorating.
  • Reduced Working Time: High temperatures drastically shorten the window available to pump, place, and finish the material. This often forces a rushed application, which can lead to “cold joints” and difficulty achieving a consistent, smooth surface.
  • Inconsistent Coloration: Variations in drying rates—often caused by uneven exposure to direct sunlight, drafts, or hot versus shaded areas—can result in patchy or mismatched colors across the wall.
  • Excessive Suction: A hot substrate will aggressively draw moisture out of the wet plaster, causing premature drying and increased surface porosity.

Our Tips for Mitigation

If you are planning a plastering project during warmer weather, don’t let the conditions derail your finish. Here are a few ways to mitigate these issues:

  1. Work Early: Start as early as possible to finish your main work before the peak heat of the day.
  2. Dampen Substrates: Thoroughly dampen the walls before applying the plaster to help manage suction.
  3. Control Your Mix: Use cold or even iced water to mix the plaster to extend the working time.
  4. Protect the Area: Shield your workspace from direct sun and hot winds by using tarps, blinds, or shading.

Even with the challenges of a 100-year-old house and a UK heatwave, we are happy with the results. If you’re embarking on a renovation, don’t underestimate the impact of the weather—it pays to plan ahead!

Next in is the joiner to do the skirting and architrave before the plasterer comes in.

Where did we get our plaster from?

Big shout-out to the team at Galaxy insulation in Long Eaton, they are our go-to for all things insulation, dry lining, and plaster.

I’ve developed a bit of a routine of swinging by at 3:55 PM to grab our essentials for the next day—the staff are always incredibly helpful and the prices are spot on. Why the rush? Because quality matters. We never keep plaster on-site for longer than 28 days to avoid it going to waste. Fresh materials mean a better finish every time. If you’re looking for a reliable supplier, these are the folks to see!

Need a quote for some building work, call us on 07737 988 243
Categories
Renovation

Property refurbishment in Sandiacre, Nottingham

Bringing History Into the Modern Era: A Complete Victorian Terrace Renovation in Sandiacre, Nottingham

Owning a 100-year-old Victorian or Edwardian terrace house in Nottingham comes with a lot of pride. These properties are packed with character, beautiful brickwork, and historic charm. However, they also come with a unique set of challenges: drafty rooms, outdated layouts, and decades of old plaster hiding underneath layers of wallpaper.

At Swallow Hill Homes we specialize in breathing new life into these classic homes. We don’t just paper over the cracks; we strip them back to their bones and rebuild them to meet modern living standards.

Here is a sneak peek behind the scenes of our latest total refurbishment project right here in Nottingham.

IMG_6382
PlayPause
previous arrow
next arrow

The Project: A Full-Scale Terrace Transformation

Our clients loved the location and character of this traditional terrace, but the interior needed serious intervention. To do this job right, we started with a blank canvas.

Here is exactly what we are undertaking on this comprehensive renovation:

1. Strip Back to Brick & Structural Upgrades

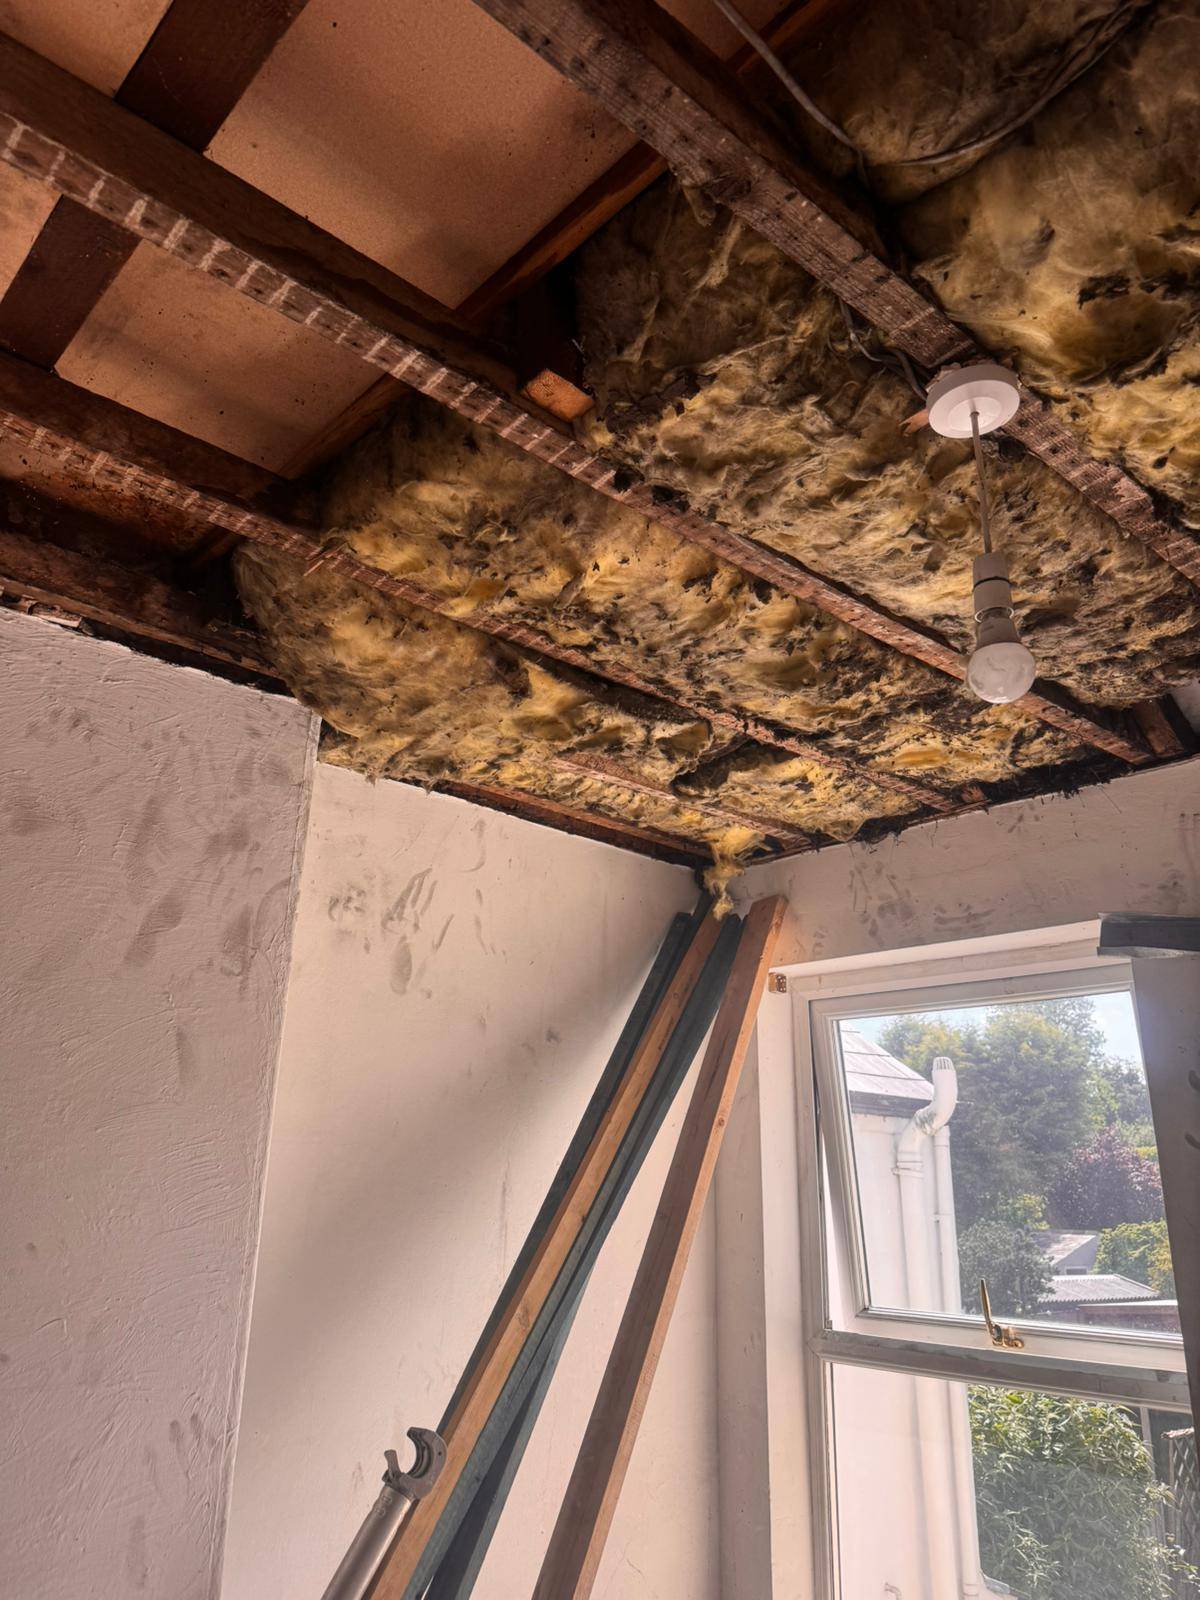
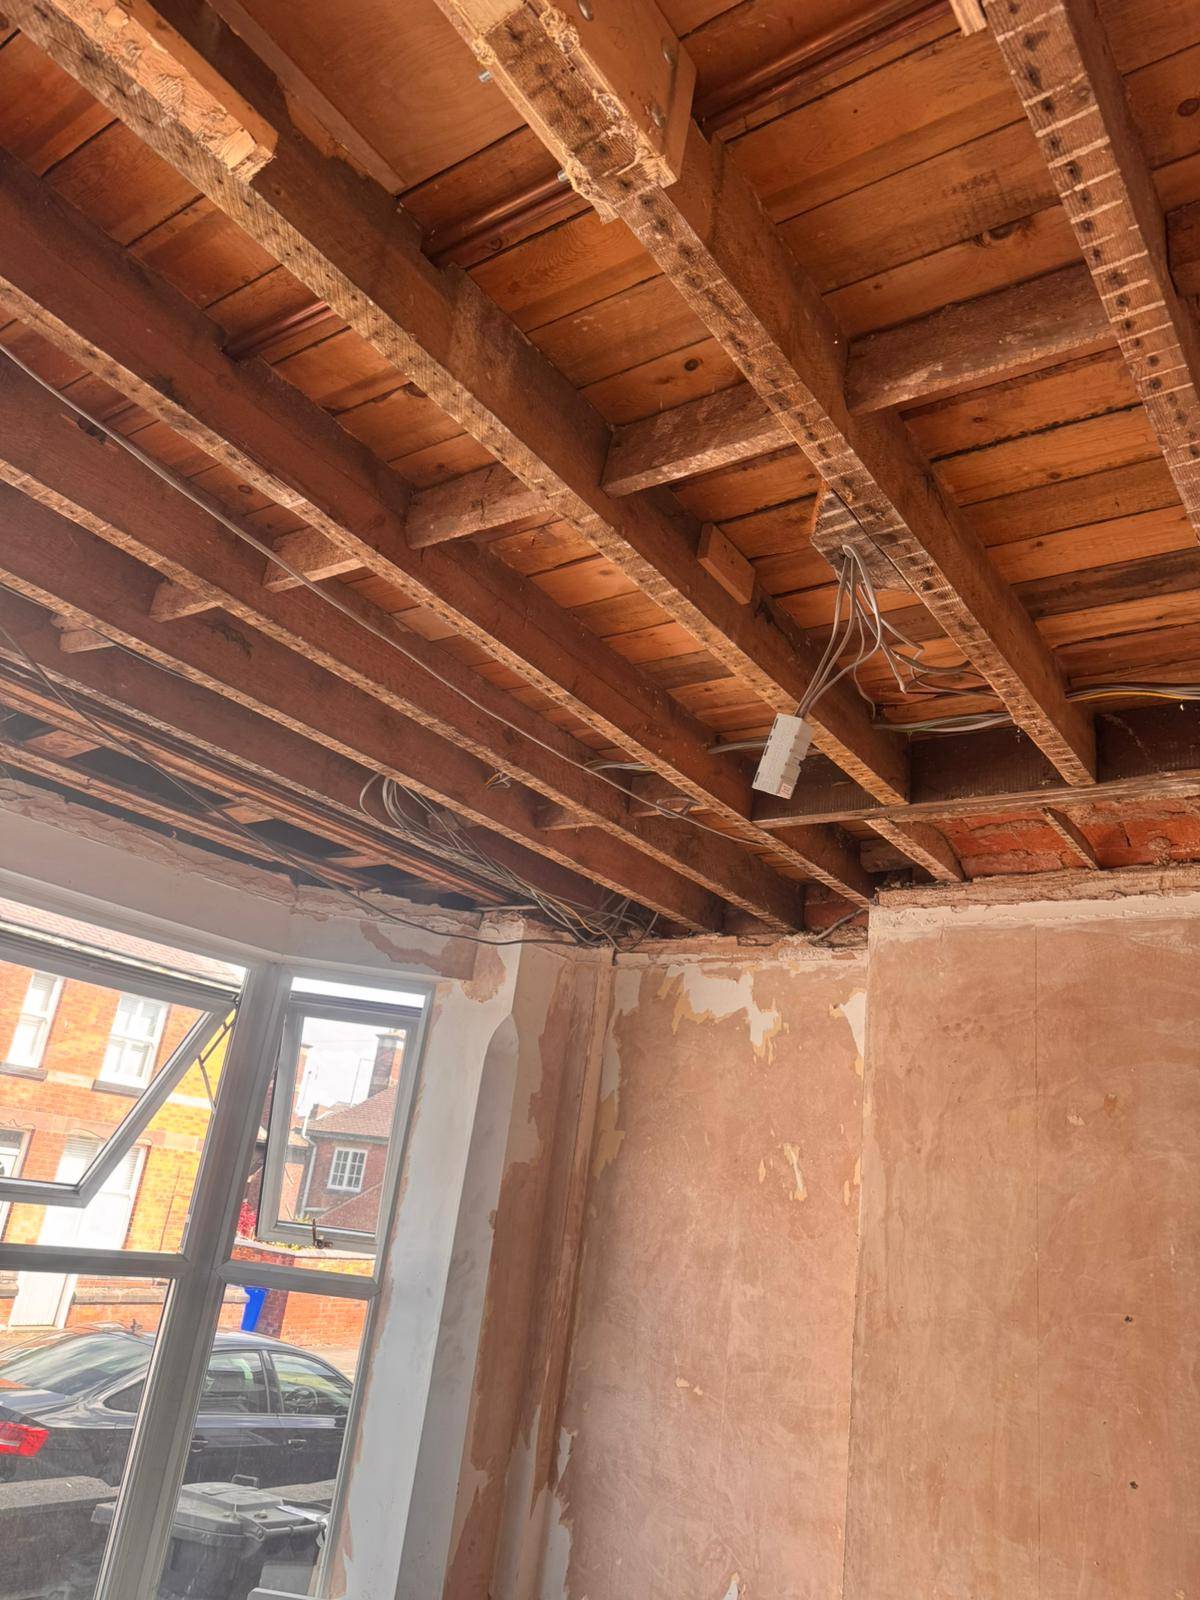
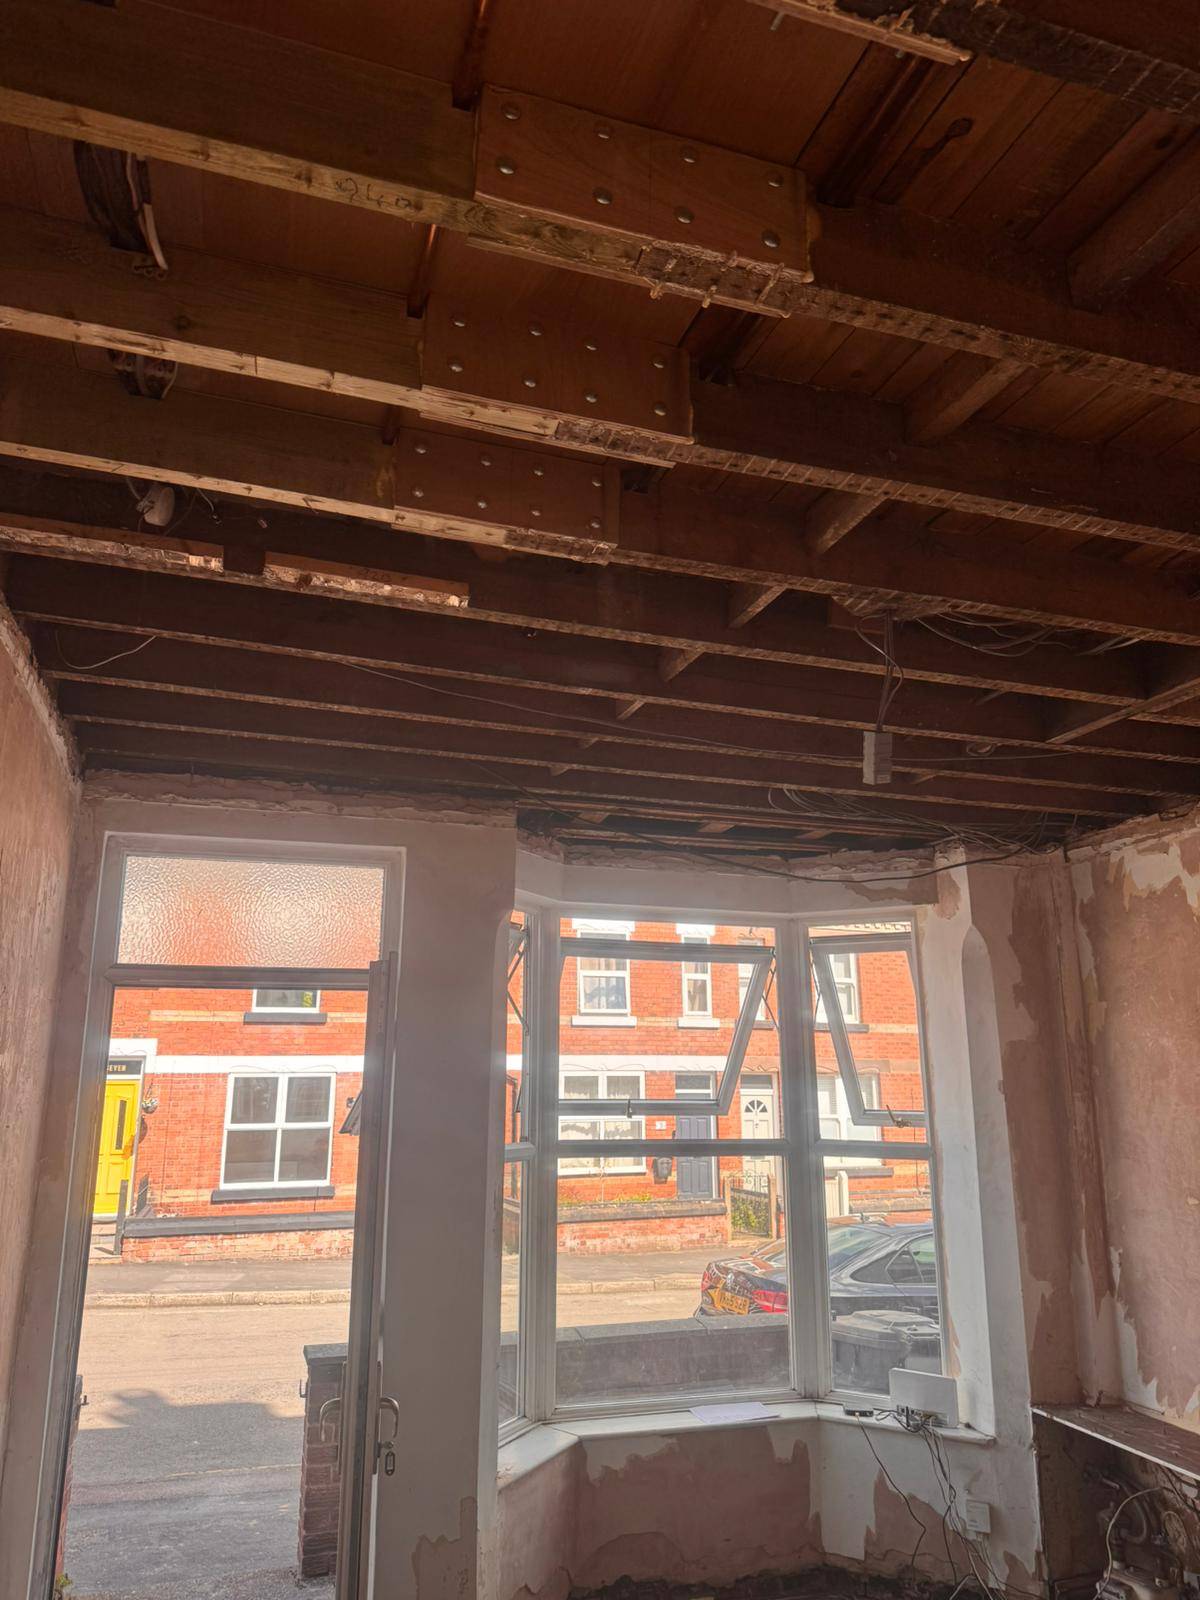
We have completely cleared out the old lath and plaster ceilings and stripped the walls back to the original brickwork. This allows us to inspect the structural integrity of the home. As you can see from our first on-site photos, we have already reinforced the ceiling joists with heavy-duty timber splicing and bolted structural plates to ensure the upper floors are level and secure for the next century.

JDP electrical fitted a new consumer unit for us
New consumer unit to replace the existing 2

2. Comprehensive Insulation & Energy Efficiency

Older solid-wall terrace houses can be difficult to keep warm, leading to massive heating bills. By stripping the ceilings back int he bedroom we have fitted Super Foil SF19 X Foil which has an Roof Thermal Resistance : 2.54R (m2K/W) and is LABC approved. A standard cavity wall in the UK is between 2.3-4.5 so for a very small loss of head height 25mm your adding a huge amount of insulation.

By choosing SuperFOIL insulation you can save yourself Space, Time & Money over traditional forms of insulation. SuperFOIL is dedicated to improving Sustainbility of our products as well as our business as a whole. Our multifoil products are produced using up to 40% recycled materials. This helps save the equivalent of approx. 80 million plastic bottles from ending up in land fill every year! Because SuperFOIL consists of multiple layers of radiant barrier foil, it can protect against heat loss through radiation that non-foil insulation’s offer no protection against. Additionally, by installing as a continuous layer and sealing fully with SuperFOIL Tape, SuperFOIL insulation provides an effective air and vapour barrier. Controlling air leakage such as draughts is paramount to the achieve high levels of energy efficiency. Useful Links: SuperFOIL Brochure-2022

This simple step will make a significant difference to warmth in the bedrooms of this 1920s house into a cozy, energy-efficient home that retains heat and decreases monthly utility costs.

3. Professional Plastering

With the structural work done and insulation in place, our team is getting to work on the boarding and plastering. We use premium finishes (like the British Gypsum BoardFinish ready to go on-site) to achieve perfectly smooth, flawless walls that provide the ultimate foundation for decorating.

4. The Grand Finale: A Bespoke Media Wall

Once the room is plastered and modern flooring is laid, we will be constructing a fully custom, bespoke media wall. This will seamlessly integrate a modern widescreen TV, integrated mood lighting, hidden cabling, and a contemporary fireplace—proving that you can enjoy cutting-edge modern luxury without losing the cozy soul of a traditional terrace.

Progress Photos: Stage 1 (The Strip Out)

Take a look at the raw potential we are working with! These initial photos show the property right after the teardown phase, highlighting the exposed joists, stripped chimney breast, and the starting point of our plastering prep.